Medileaves - Technology & IT Solutions WordPress Theme
We would like to thank you for purchasing our theme. It is a Powerhouse of Great Features with Powerful Functionalities, please be sure to always search our Documentation. This Documentation Contains general information and step by step guidelines on how to set up the theme.Medileaves Introduction
This documentation will give you an understanding of how Medileaves Theme is structured and guide you in performing common functions.
NOTE: we will not respond to any support questions on Item comment section or through e-mail. If this document doesn't answer your questions feel free to open up a private ticket in our support forum
If you want to customize, please contact us here: our support forum
First steps
To install this theme you must have a working version of WordPress already installed. If you need help installing WordPress, follow the instructions in WordPress Codex. Below are all the useful links for WordPress information.
- General information about WordPress. - WordPress FAQ
- A great knowledge-base for WordPress beginners. - WordPress Lessons
- Detailed information on WordPress PHP functions and a lot of usage examples. - PHP Function References
Server requirements
To use the Medileaves theme, you must be running WordPress 5.0 or higher, PHP 7.0 or greater, and MySQL 5 or greater on your server. We have tested it on Linux, Mac and Windows. Below is a list of items you should ensure your host can comply with.
- Check to ensure that your web host has the minimum requirements to run WordPress and themes;
- Always make sure they are running the latest version of WordPress;
- You can download the latest release of WordPress from the official WordPress website;
- Always create secure passwords for FTP and Databases.
Minimum PHP requirements
We recommend that you contact your web hosting service provider to make sure that your server PHP configuration limits are as follows:
- PHP time limit - (max_execution_time) 3000
- PHP memory limit - (memory_limit) 256M
- Max upload size - (upload_max_filesize) 16M
- File upload permission - (file_uploads) set to Available
Installation
There are two ways to install a WordPress theme: using the built-in installer or by uploading it via FTP.
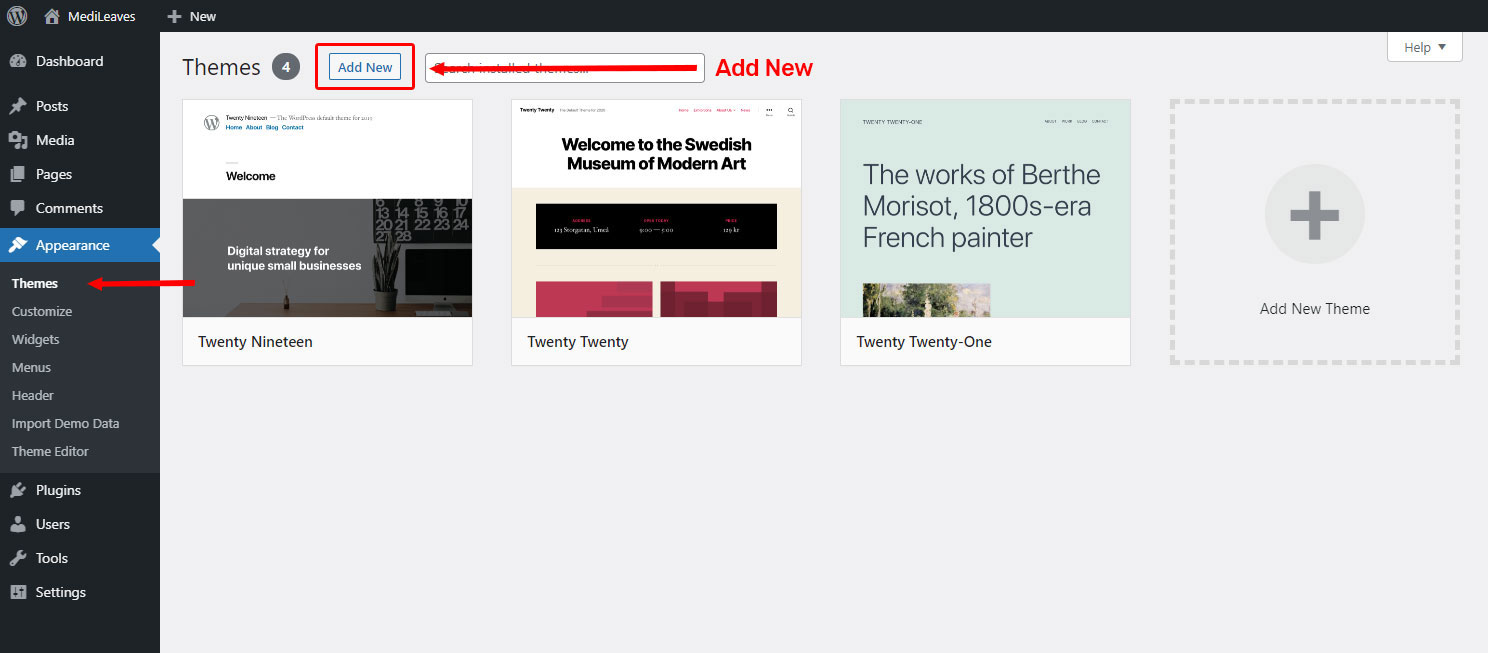
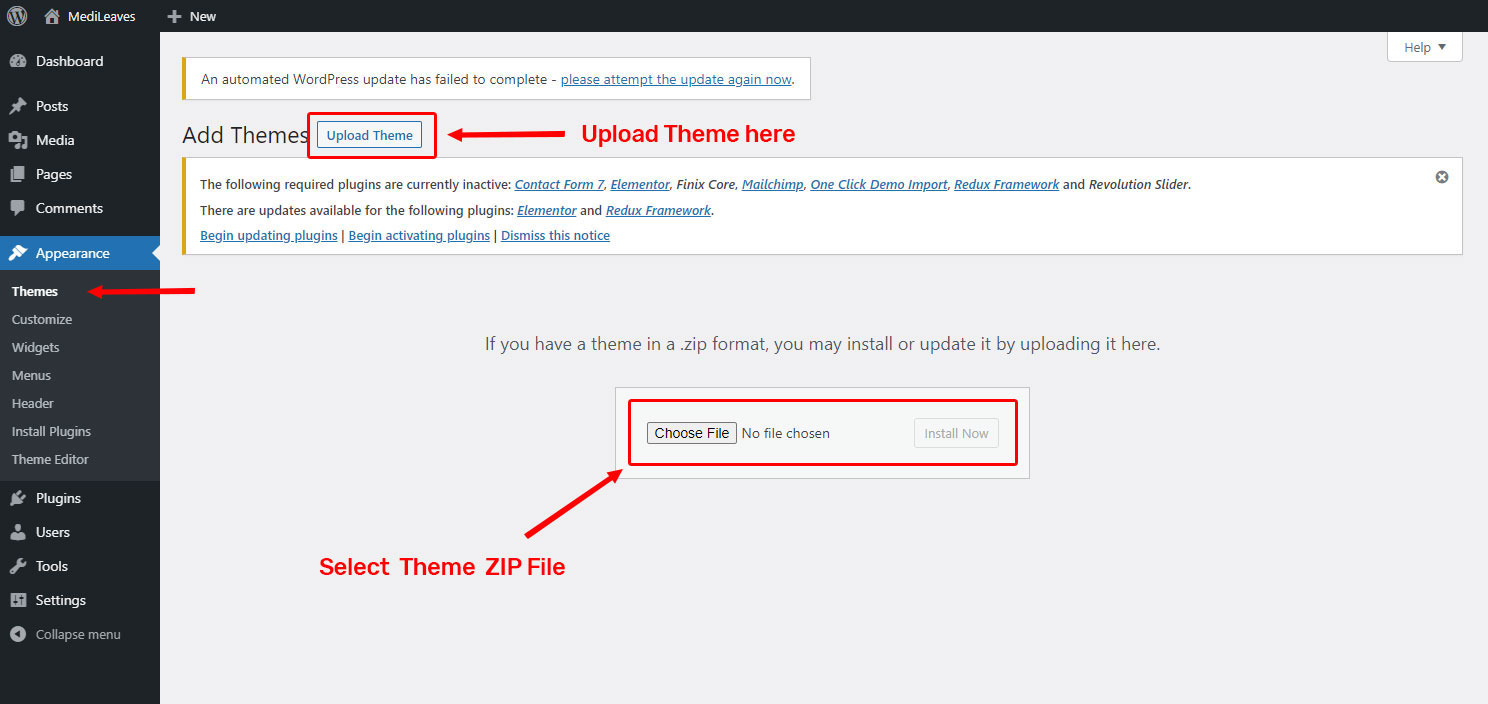
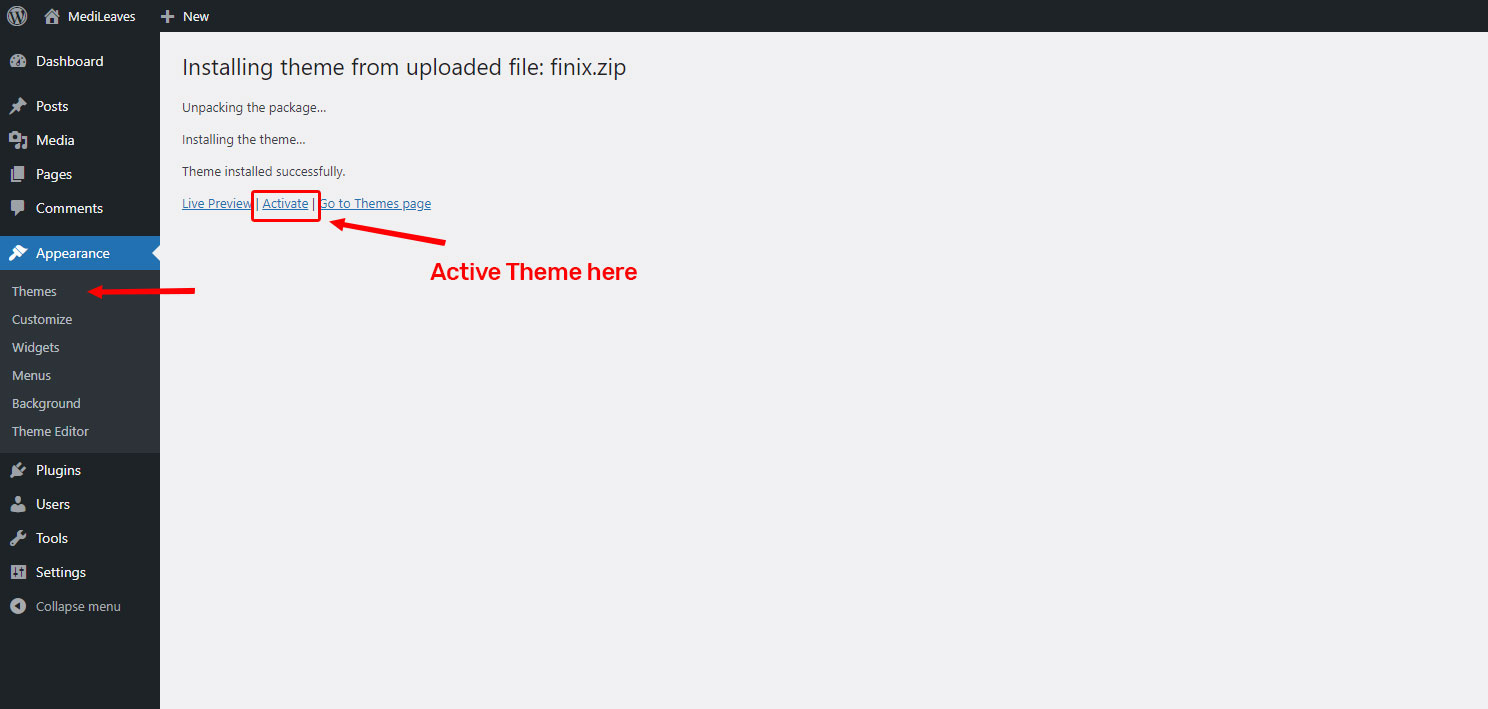
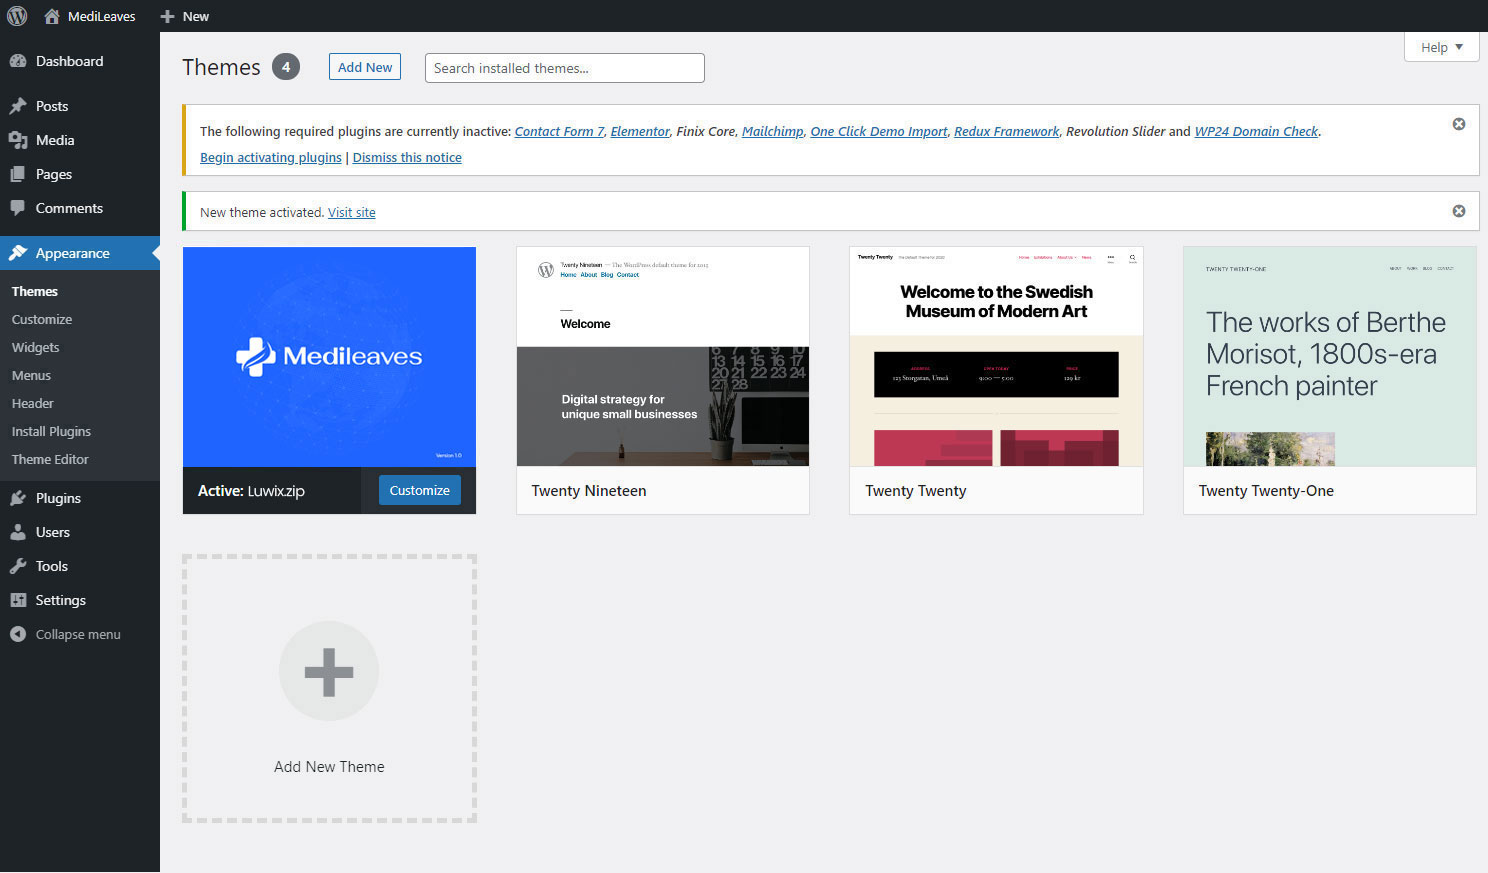
Install Theme via WordPress
- Log in to the WordPress Administration Panels.
- Select the Appearance > Themes > Add New.
- Use the Upload Theme button to upload a zipped copy of Medileaves Theme.
- Go to Appearance > Themes and activate the theme.
Install Theme via FTP
We recommend that you contact your web hosting service provider to make sure that your server PHP configuration limits are as follows:
- Download the Theme archive and extract the files it contains;
- Use an FTP client to access your hosting server;
- Unzip the Medileaves.zip archive, put its contents (folder called Medileaves) in the /wp-content/themes directory provided by WordPress;
- Go to Appearance > Themes and activate the theme.
Updating the theme
We recommend to use Envato Market plugin to update theme as it's fast and auto process. Here are steps:
- Download the Envato Market plugin and install it through the WordPress Dashboard at: Appearance Widgets
- Than you just need to configure "Envato Market" plugin. This is one time process. You just need to link your ThemeForest account with your "Envato Market" plugin. Just follow this for step-by-step tutorial for this.
- Than just go to Admin Envato Market menu and click on "Themes" tab. Now you can see Medileaves theme with update link on it.
- After theme update, you may see message to update some plugins. Make sure you update all plugins too.
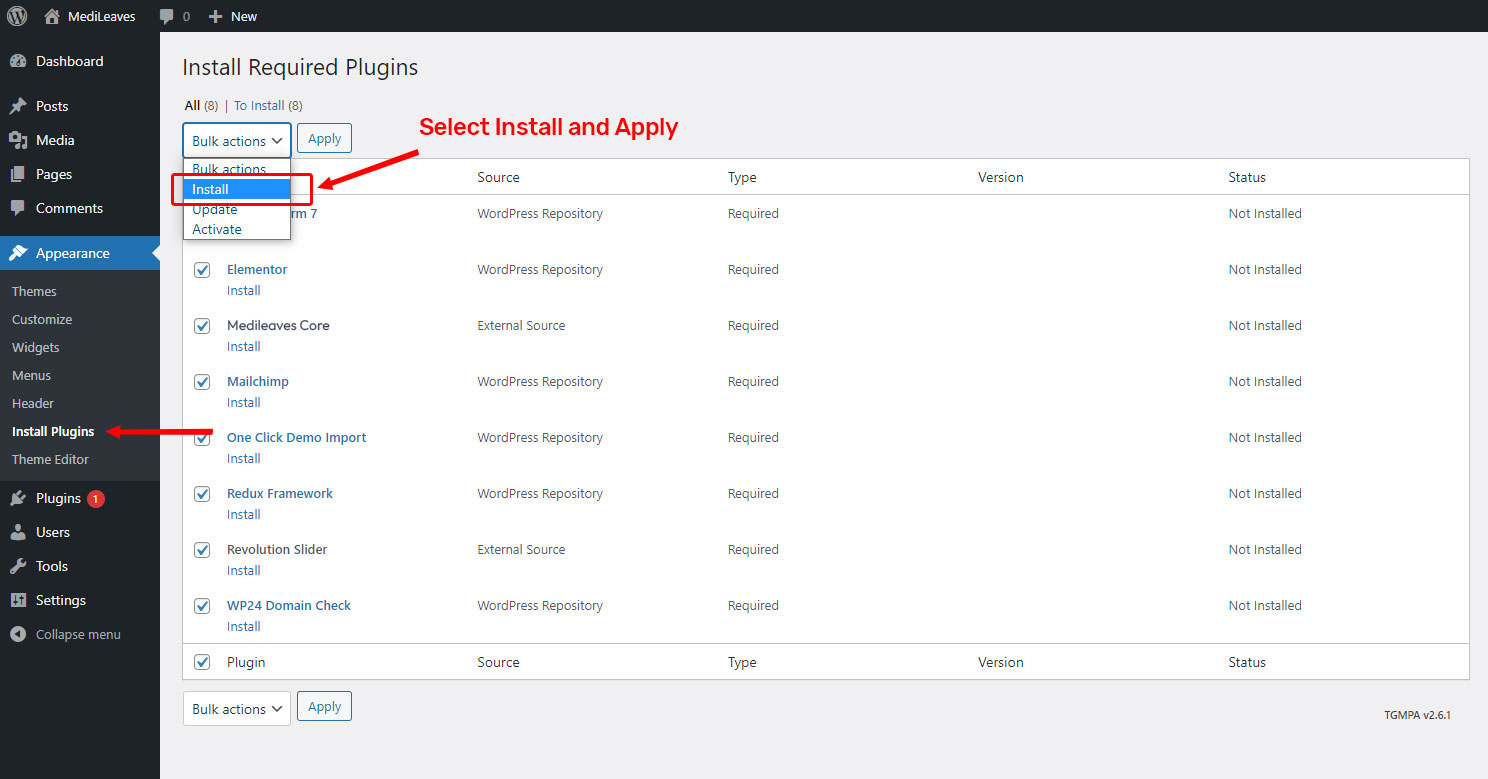
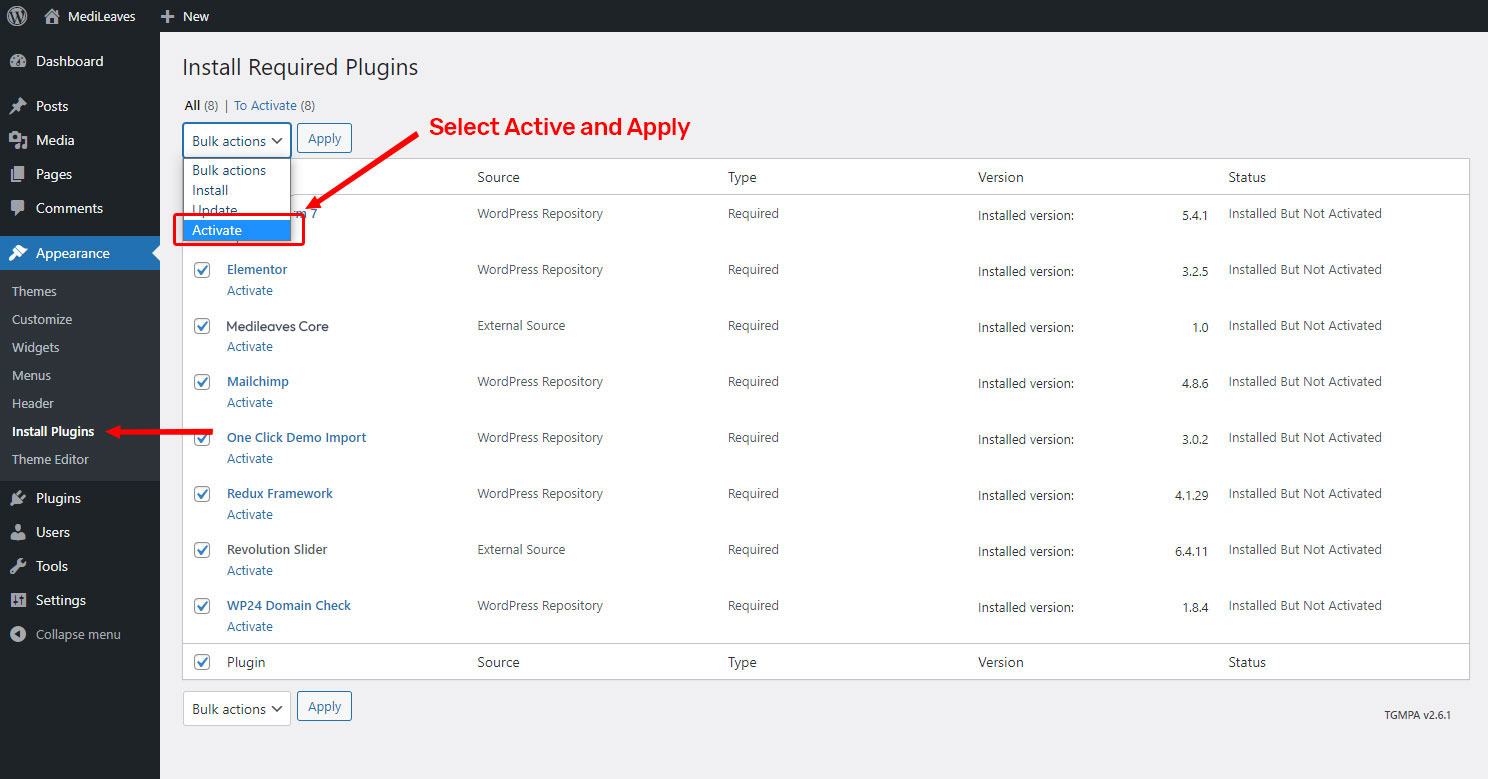
Plugins Installation
After you install the theme, you should see a list of suggested plugins at the top of the WordPress dashboard. If you already closed it out, you can go to Plugins folder of the Theme package instead to activate plugins.
Basic site setup
There are two ways to install a WordPress theme: using the built-in installer or by uploading it via FTP.
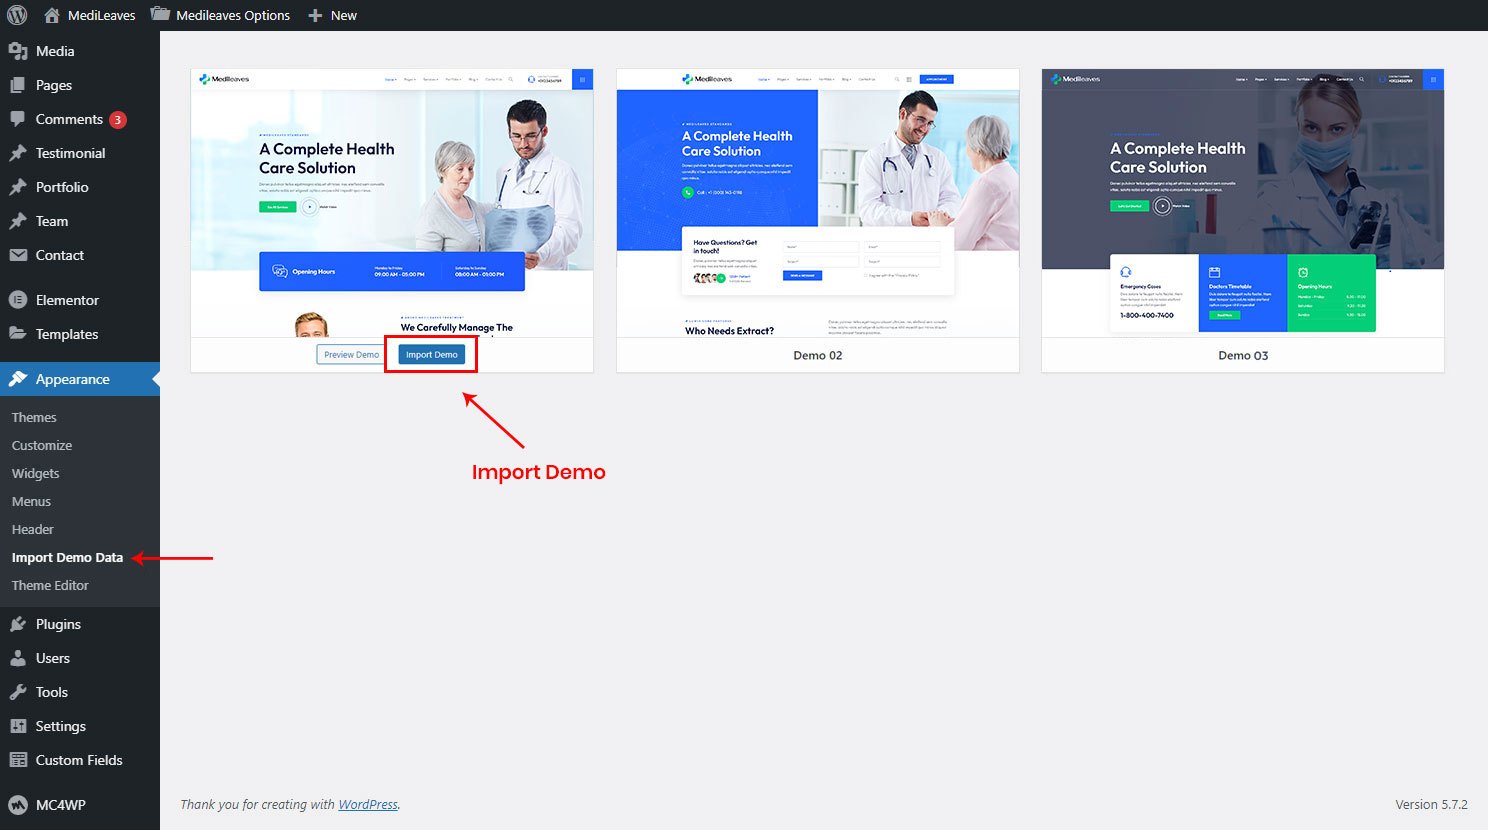
Import demo content
- Ensure, that the Medileaves Importer plugin is installed and activated;
- From the dashboard go to Appearance > Import Demo Data;
- Choose the demo you want to install and click on the Import Demo button
Setting a homepage
To set the demo as the homepage:
- From the dashboard go to Settings > Reading;
- Find the Your homepage displays option and toggle the switcher to A static page (select below);
- Choose the demo homepage and save your changes.

Theme Options
The Theme Settings dashboard contains 17 menu sections.
In almost each of these you can customize a certain part of your website.
In this article we’ll briefly explain what you can do in each of these tabs.
General Setting
This tab contains such tabs as Theme cursor, sidemenu and back to top settings.

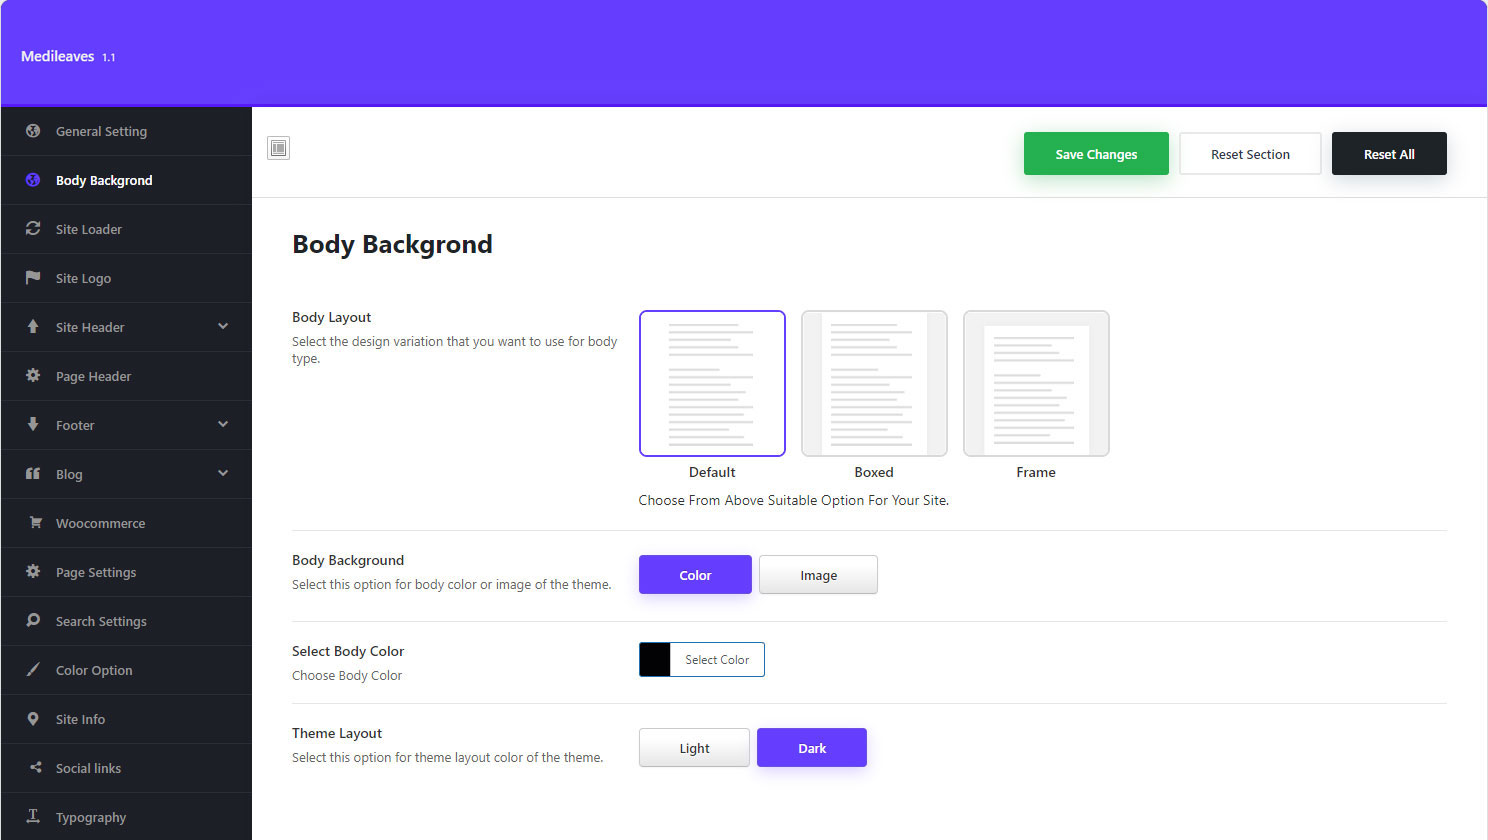
Body Backgrond
This tab contains such tabs as Body Backgrond Settings.
The Body Backgrond tab allows you to set the body layout, background and colors settings.
Site Loader
This tab contains such tabs as Loader Settings.
The Site Loader tab allows you to set the loader colors, background and other.

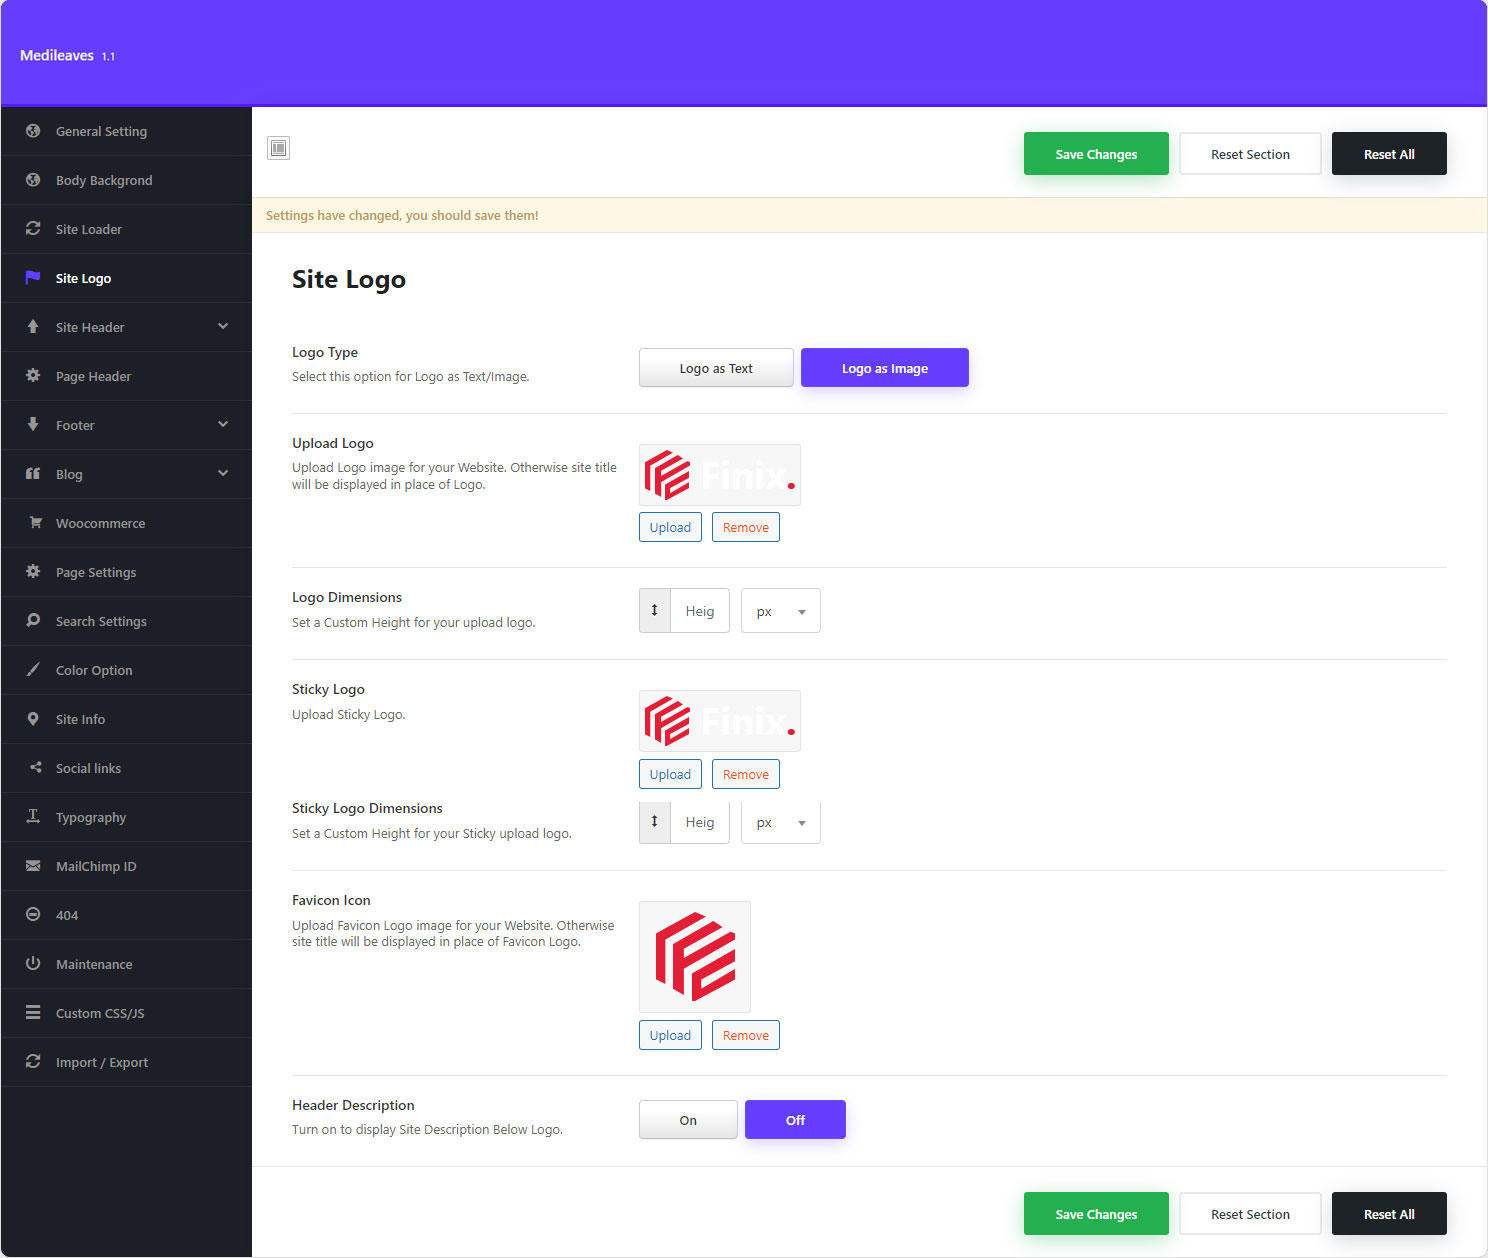
Site Logo
This tab contains such tabs as Logo Settings.
The Site Logo tab allows you to upload a logo image that will be used site-wide or use a text logo.
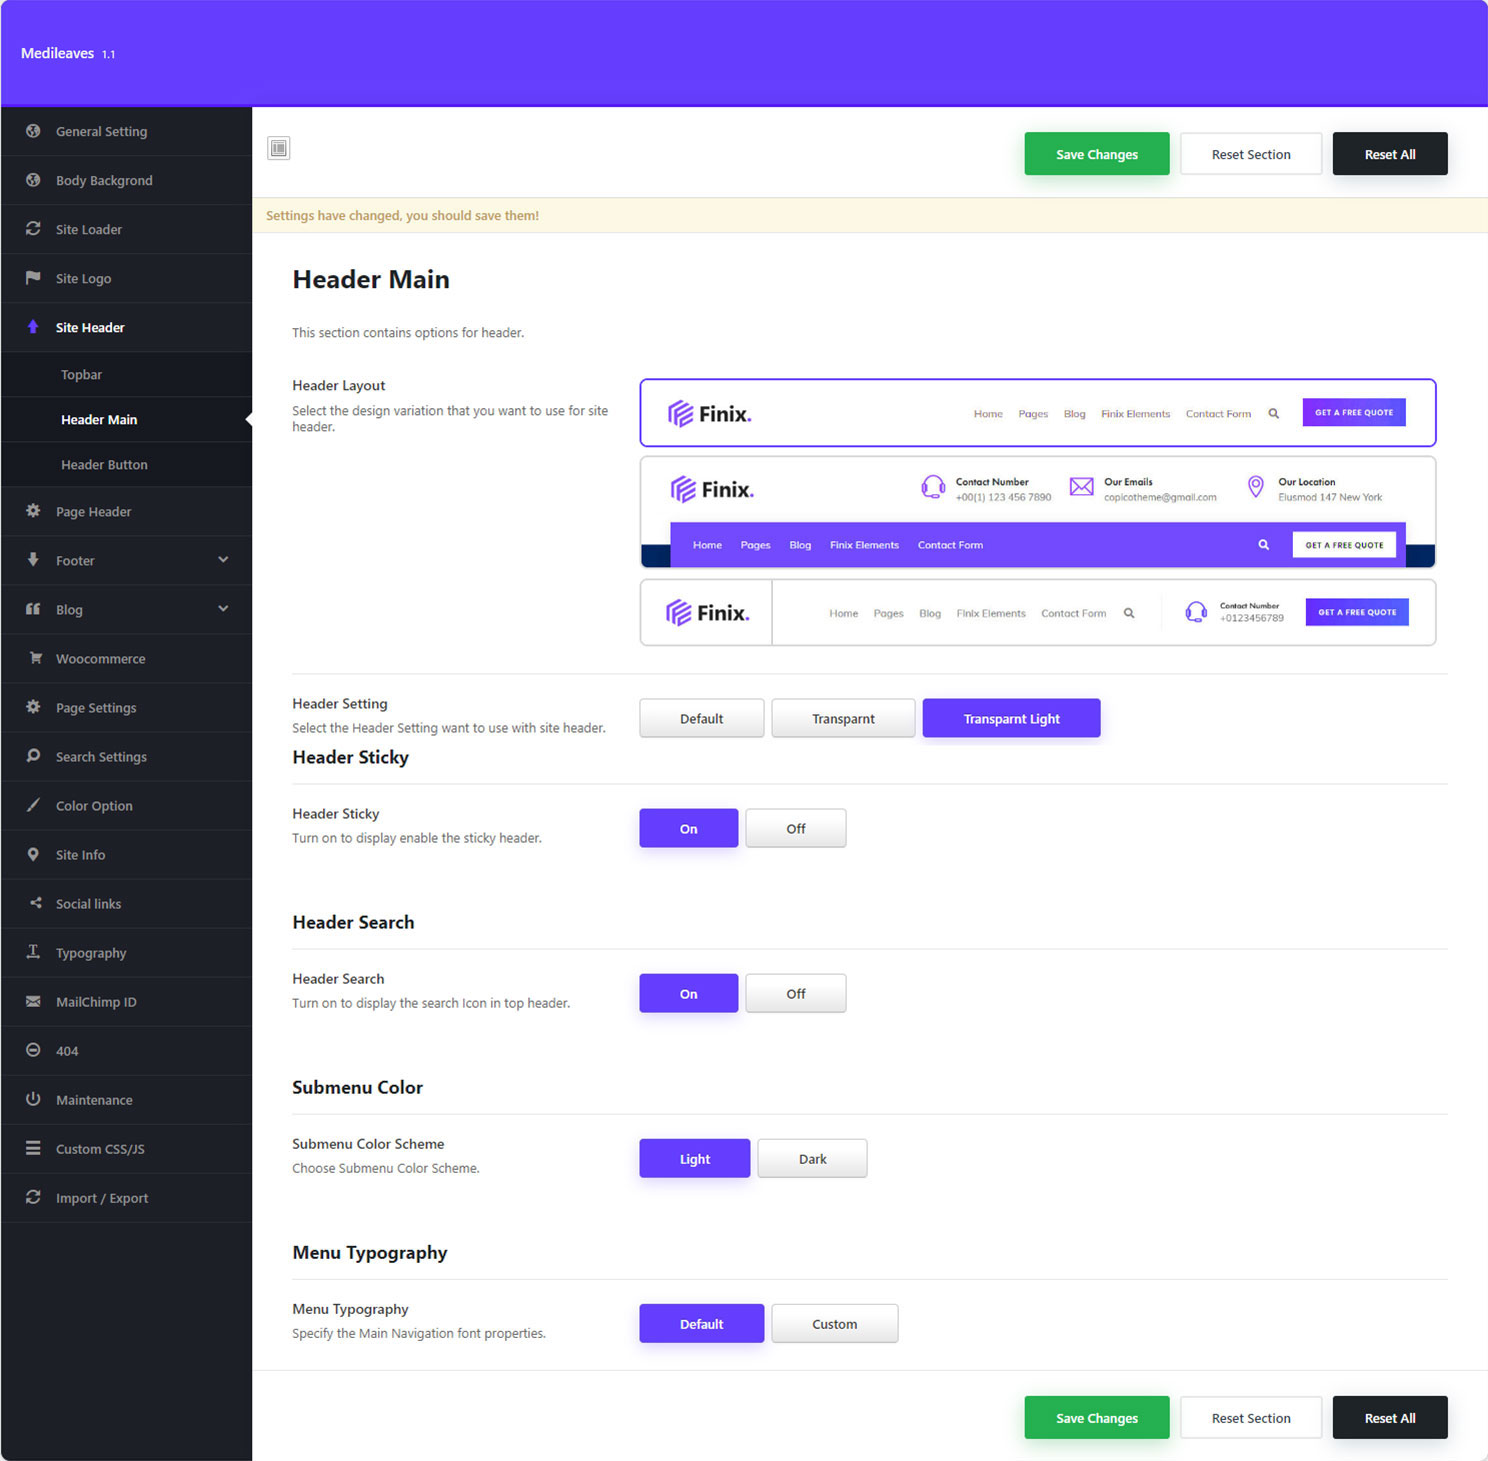
Site Header
This tab contains such tabs as Header Settings.
The Site Header tab allows you to set the header topbar, layout, button and other.
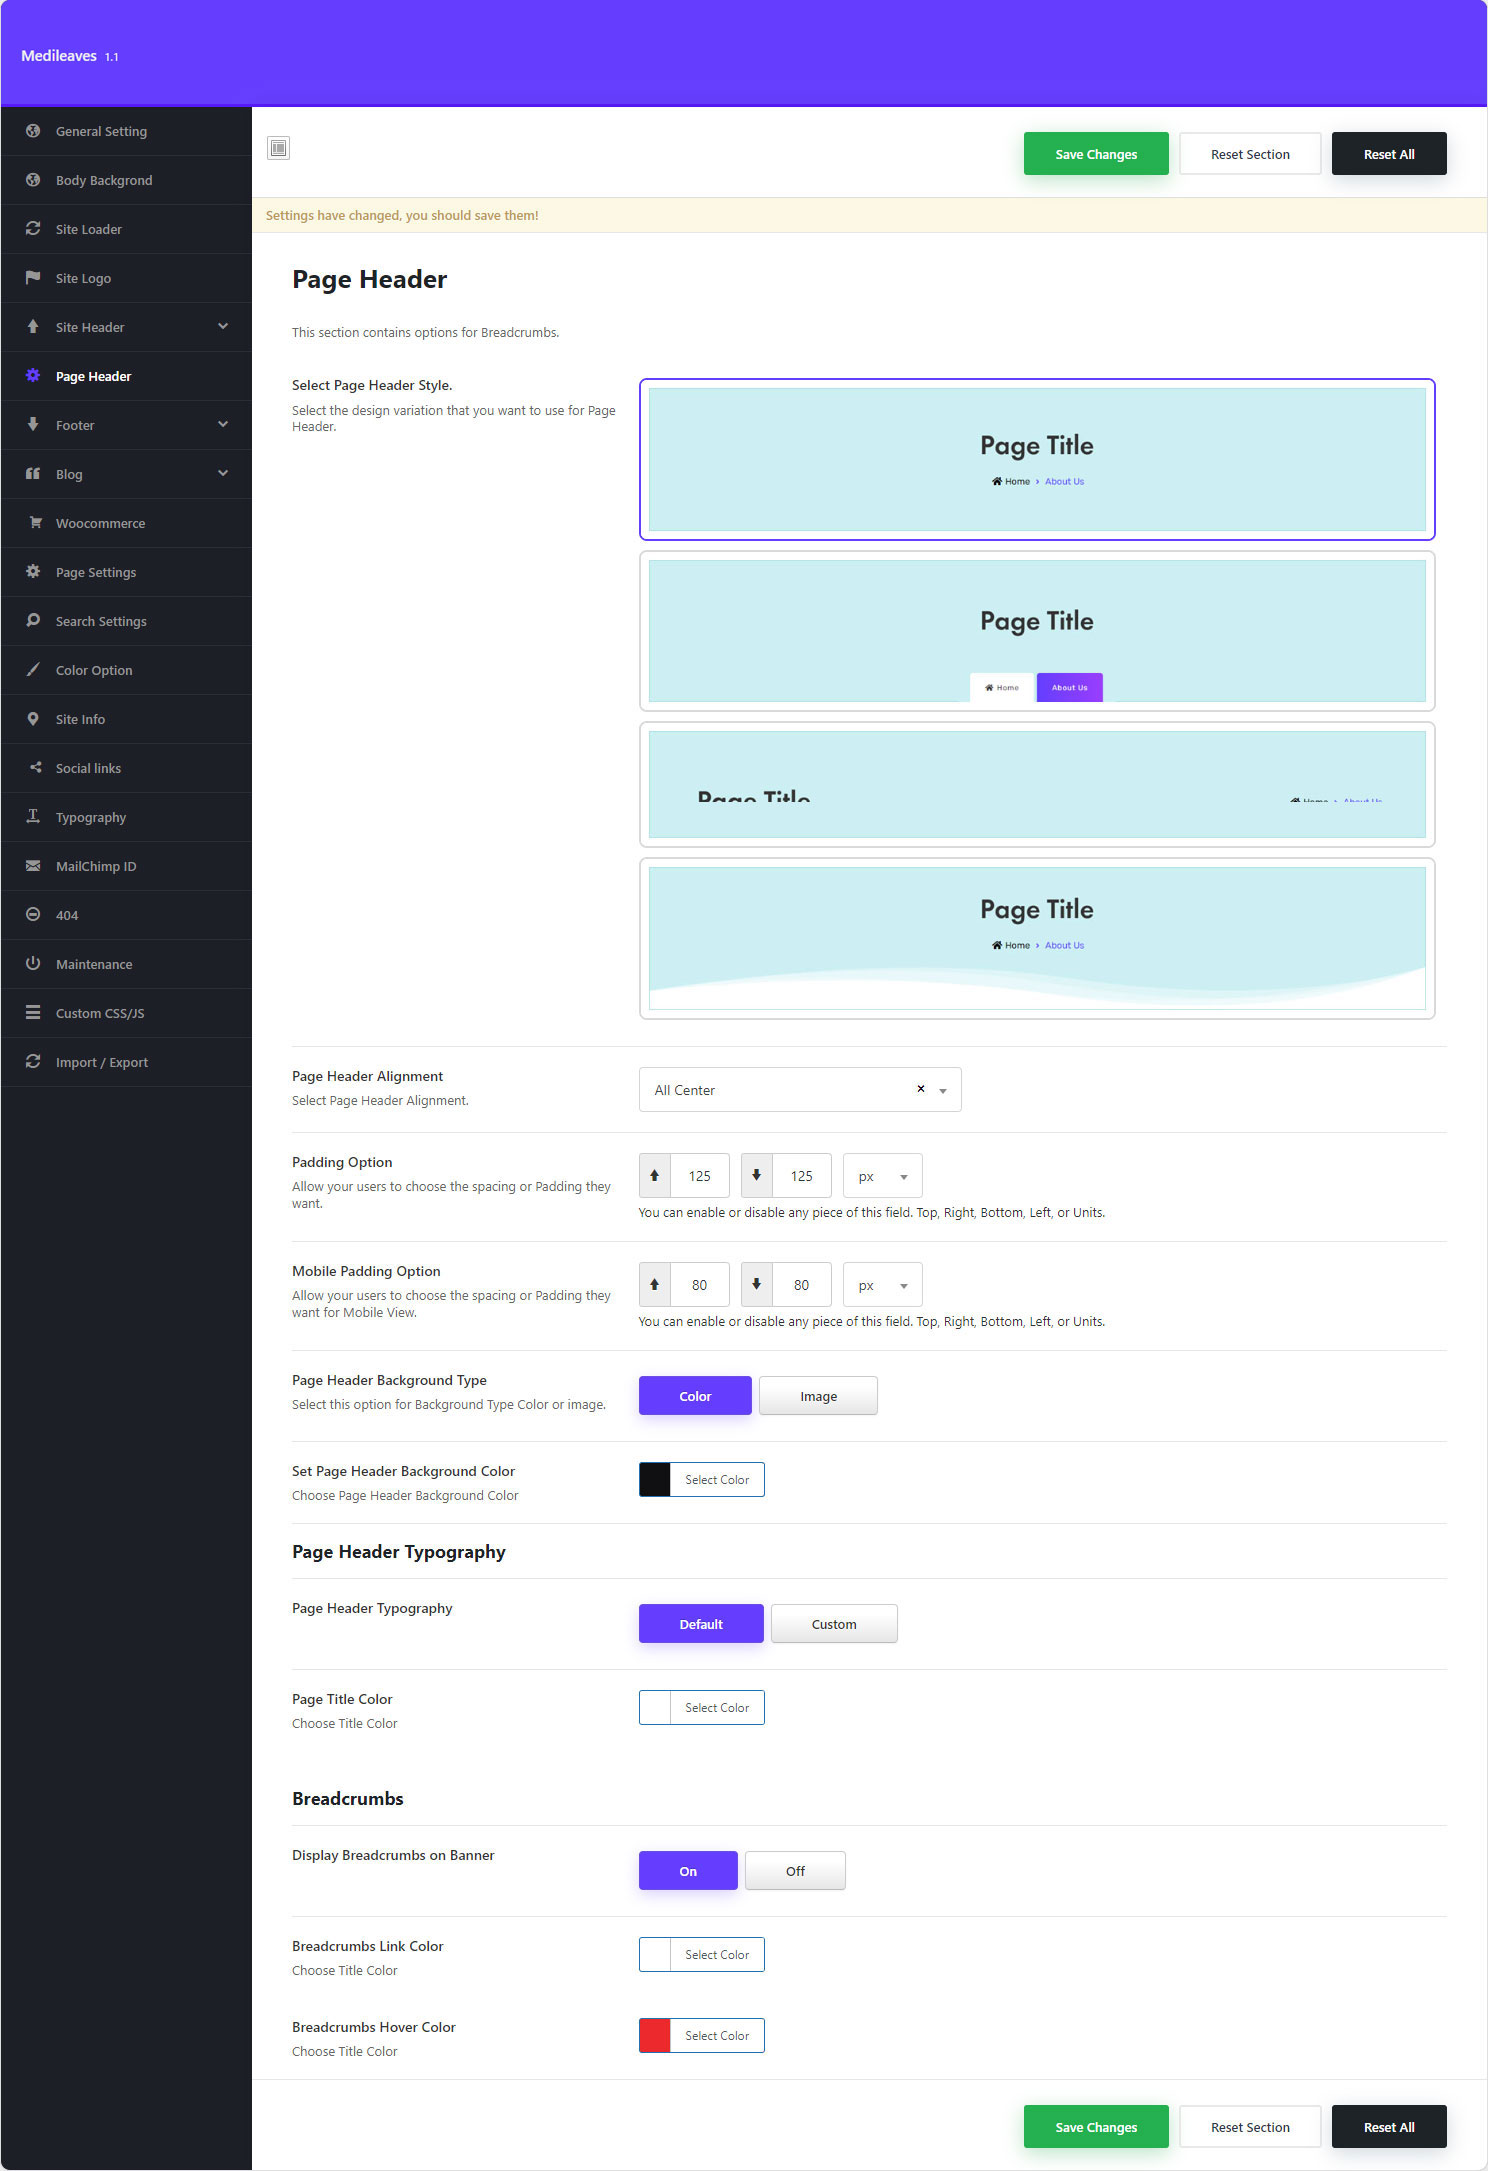
Page Header
This tab contains such tabs as Page Header Settings.
The Page Header tab allows you to set the page header breadcrumbs,alignment, background, color, typography and other.
General Blogs
This tab contains tabs such as Blog Layout ,Blog Page and Blog Singal Page Settings.
In the Blog Layout tab you can set the style of your blog’s classic, grid and list that contains your posts.
The General Blogs tab allows you to set up your blog’s sidebar, custom content position, display filters and other.
WooCommerce
You can change settings related to WooCommerce from here.
Page settings
This tab contains tabs such as Page, Search and Archive Sidebar Settings
Color Option
This tab contains tabs such as Theme Colors.
These are basically handy shortcuts for all of your site’s elements that will set the color you choose here unless you set the color explicitly when editing your page/element.
Site Info
This tab contains tabs such as site information.
Typography
This tab contains tabs such as Fonts Settings.
404
This tab you can change 404 Page Contant from here.
Maintenance
This tab you can control “Maintenance” and “Coming Soon” pages.
Custom CSS/JS
This tab you can add custom CSS and JavaScript. It can be useful if you want to do any custom formatting with CSS or functionality with JavaScript
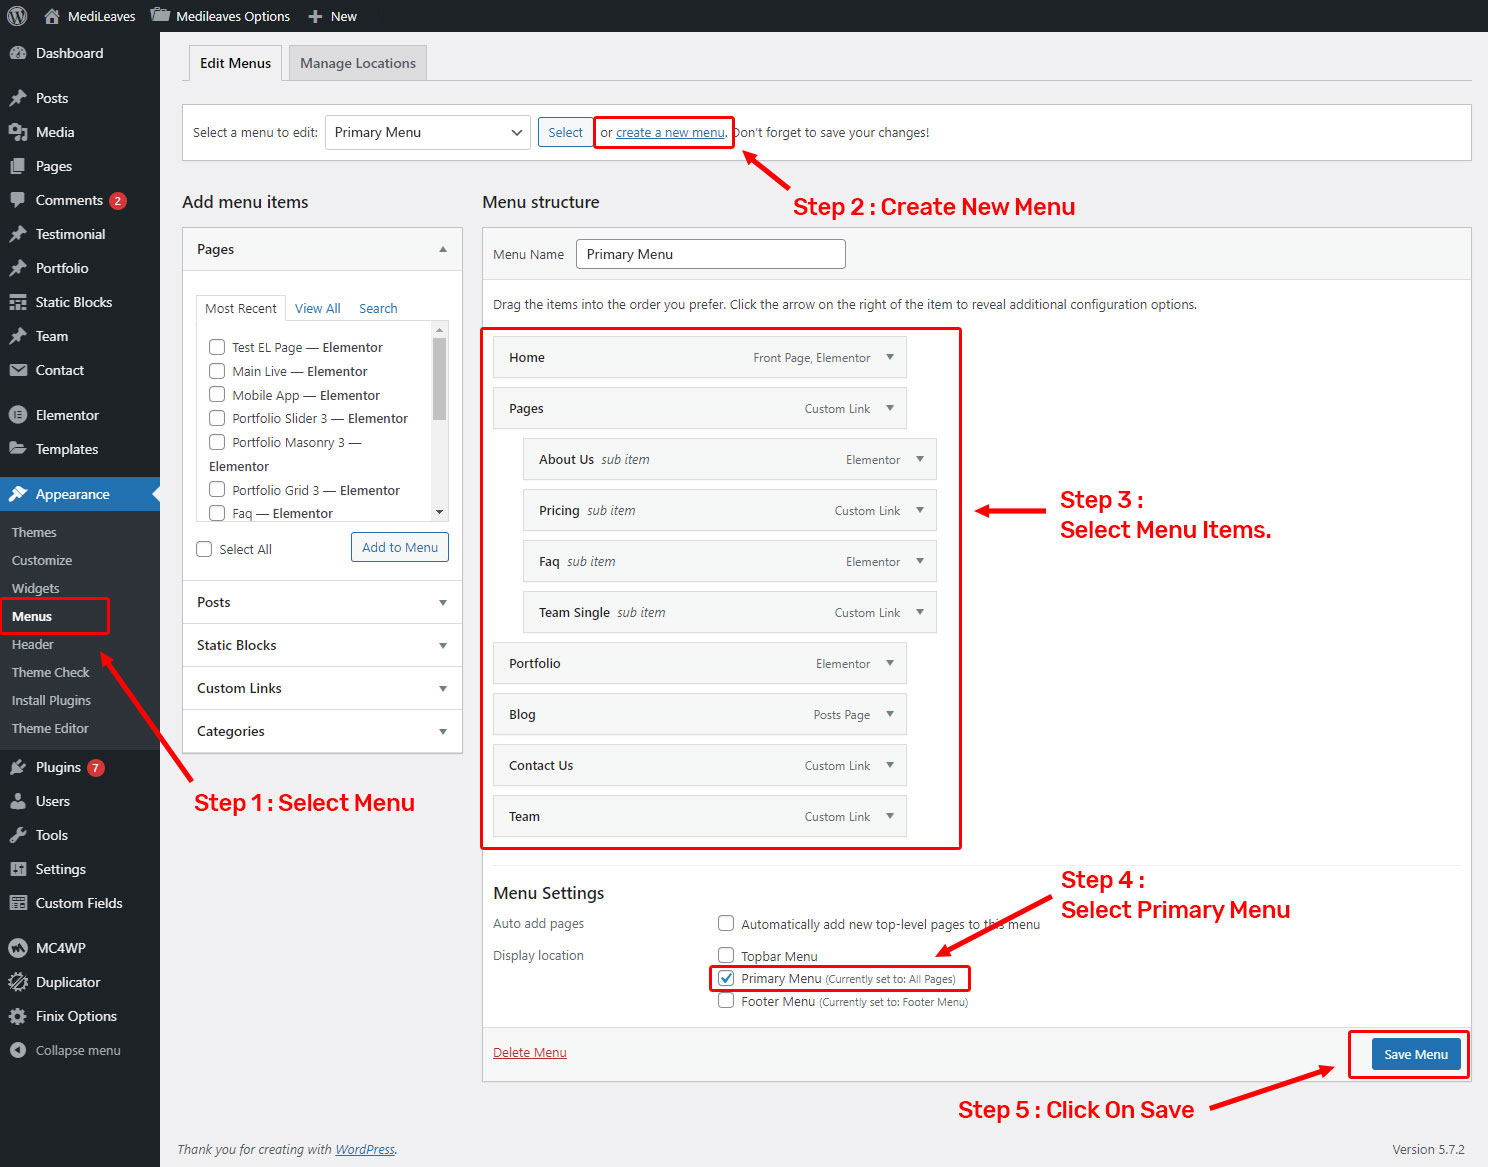
Creating a Menu
To create a menu for your site, do the following:
- Step 1 : From the dashboard go to Appearance > Menus
- Step 2 : Create a new menu to click on Click a new menu and Click Save Menu button.
- Step 3 : On the left, Check the checkbox of every element you want to have in your menu and Click Add to Menu
- Step 4 : You have to set Display location in Menu Settings Check the checkbox as Primary.
- Step 5 : Click on Save Menu button. Finally, your Primary menu Ready.
Mega Menu Setting
To set up a mega menu make sure you follow the steps below:
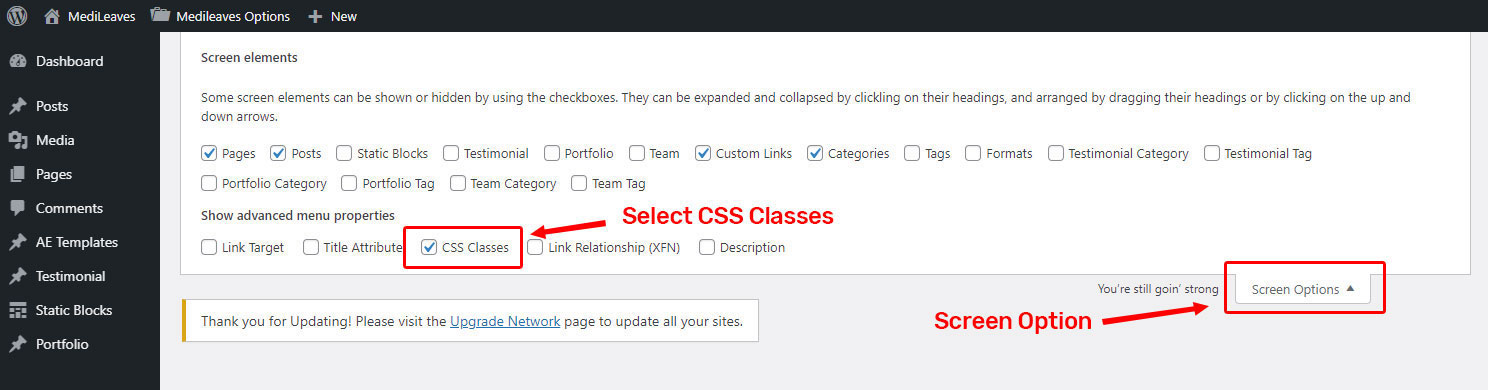
1. Enable CSS classes :
Scroll up and find the "Screen Options" at the top right of the Menu, and click on the drop-down arrow. The screen should look like this:
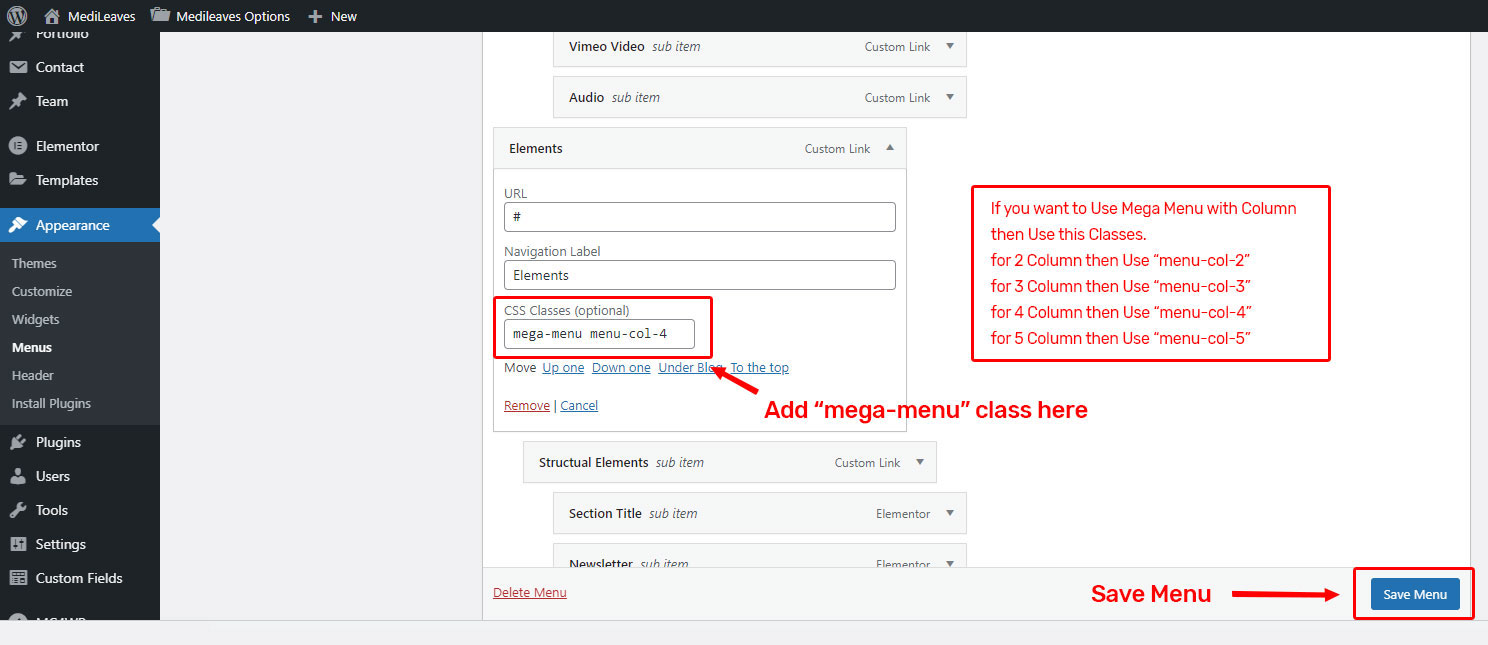
2. Go back to your Menus :
Go back to your "Menus" section and click on the Drop-down arrow of the menu item icon, and when the screen opens up, find "CSS Classes" and type mega-menu. and If you want to Use Small Mega Menu then use mega-small Class.
One Page Menu Setting
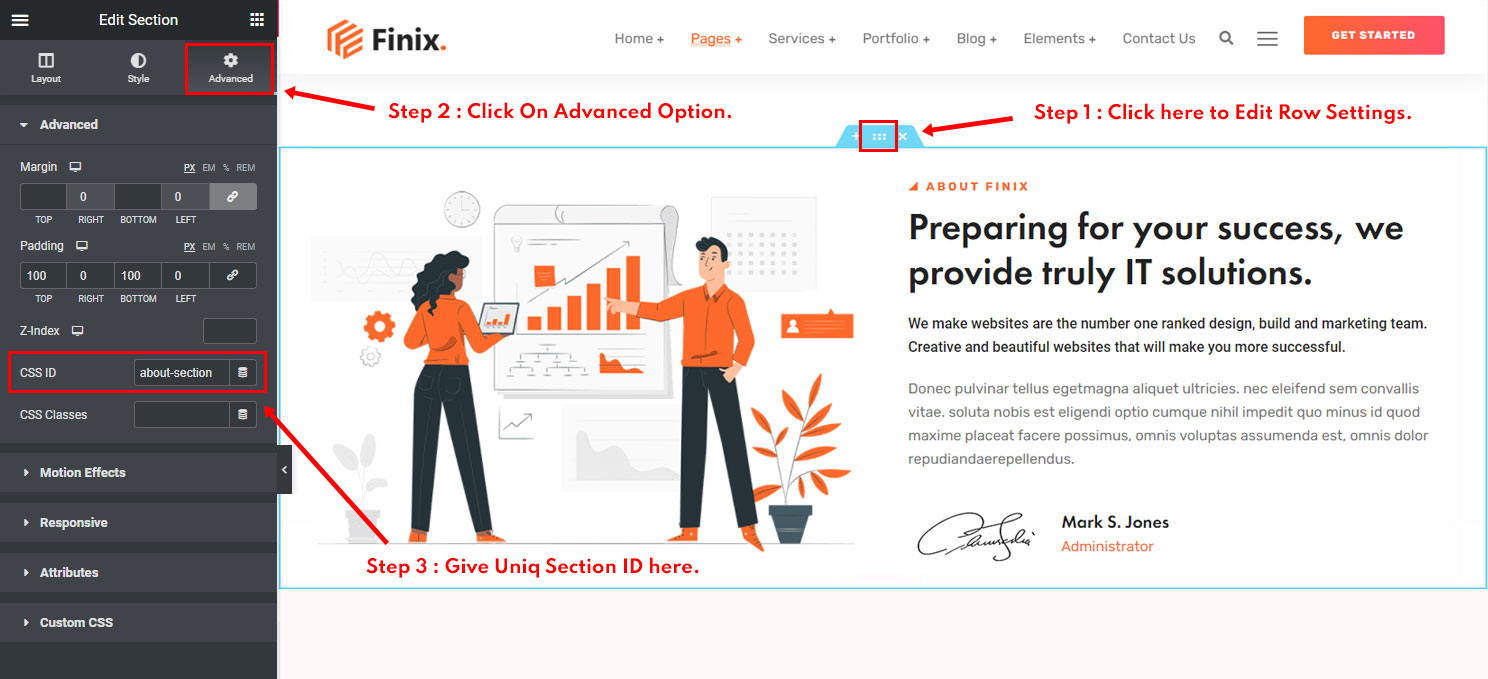
Creating one page navigation can be done by using below simple steps. Heres is the 4 steps below:
- Step 1 : When creating the homepage using Elementor elements, Click Edit Row Settings.
- Step 2 : After Open Row Settings Click on Adcaced Option.
- Step 3 : You can add Uniq Section ID in "CSS ID" input.
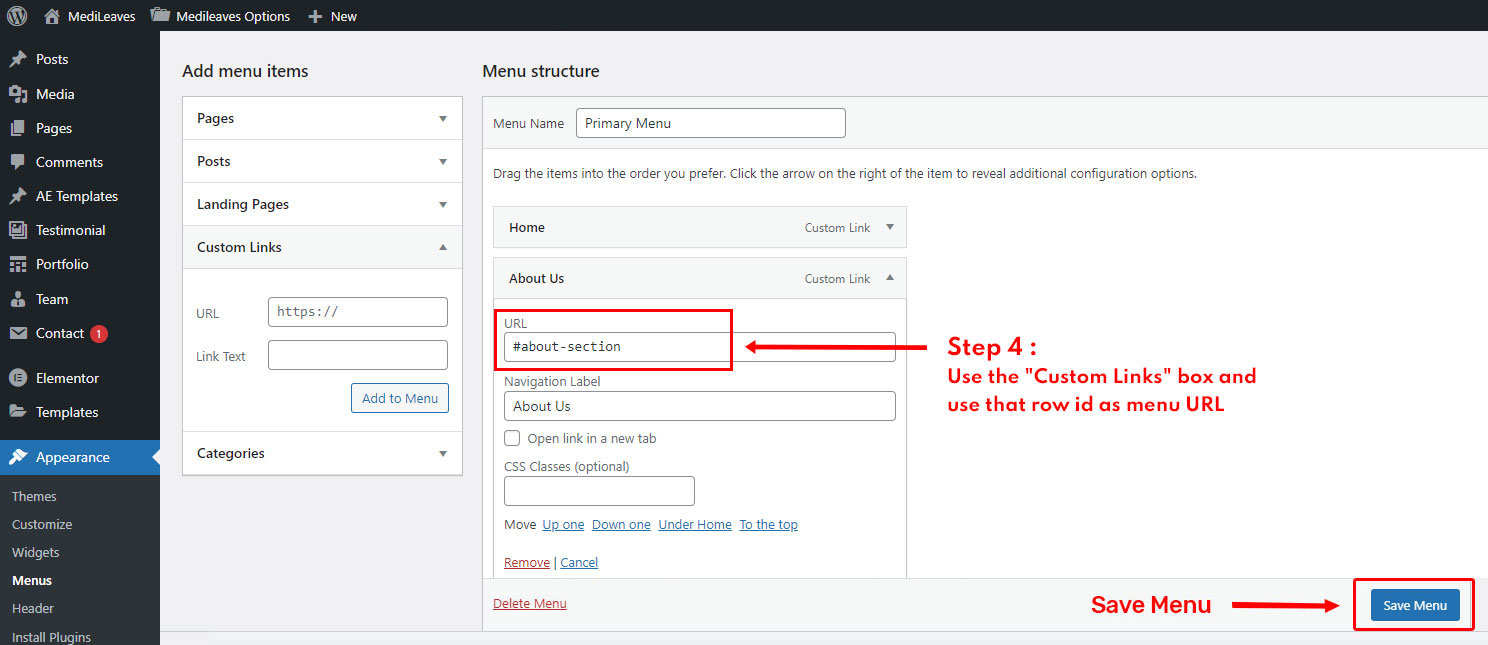
- Step 4 : When creating the menu items, use the "Custom Links" box and use that row id as menu URL.
Elementor Widget
Medileaves has supported with Elementor Page Builder. the Elementor widgets shortcode are helpful and to create a dynamic website as per the requirements. Below you will see the list of the shortcode/widget that the theme provides.
Elementor is an external service and the plugin is developed by third party developers. They have already provided very good documentation.
Elementor Documentation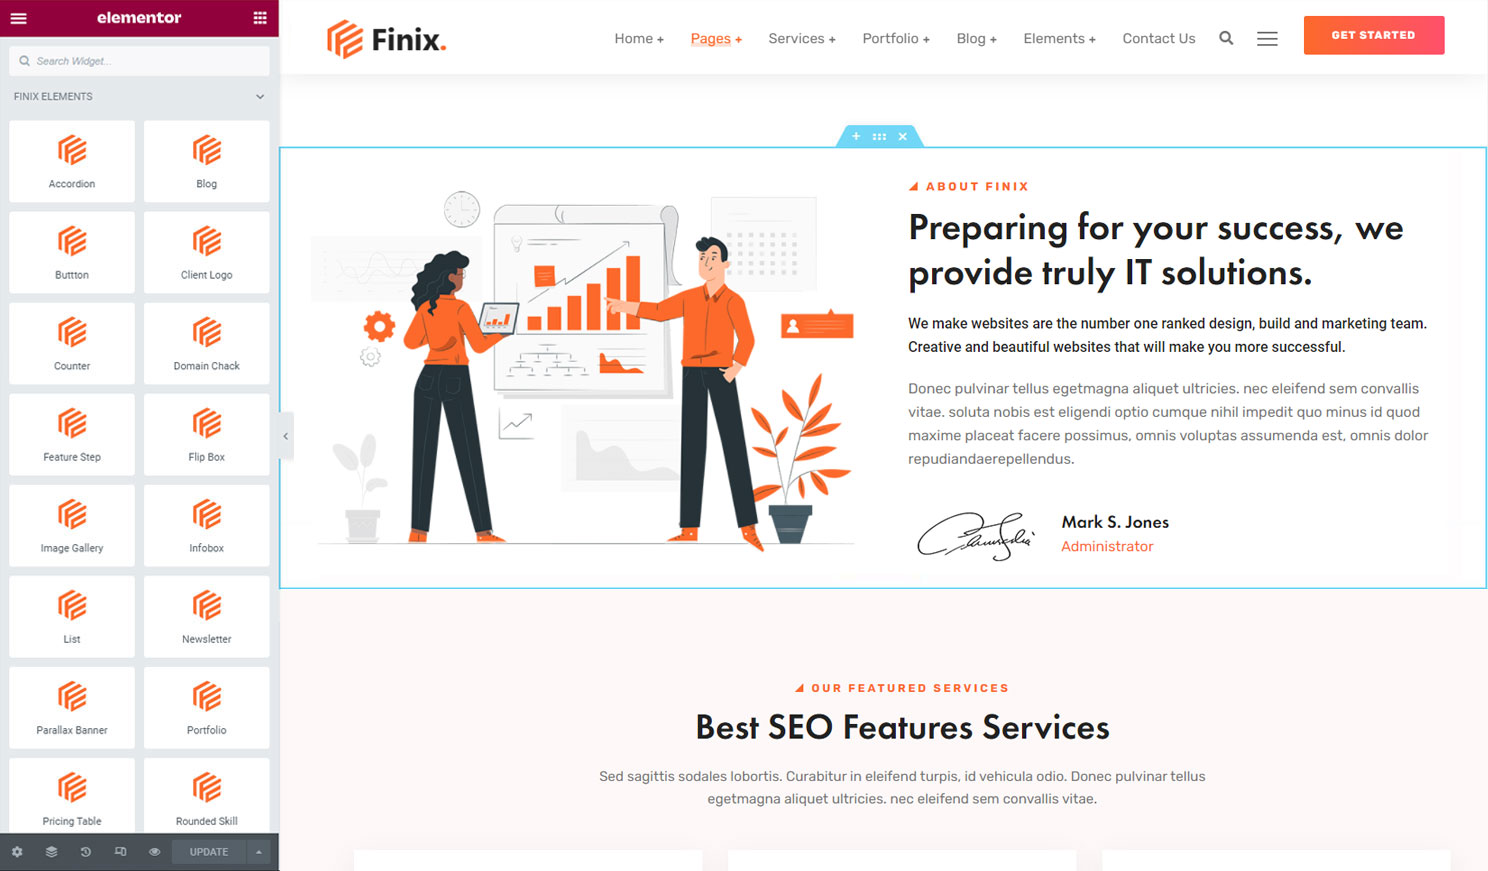
WooCommerce
Creating a shop
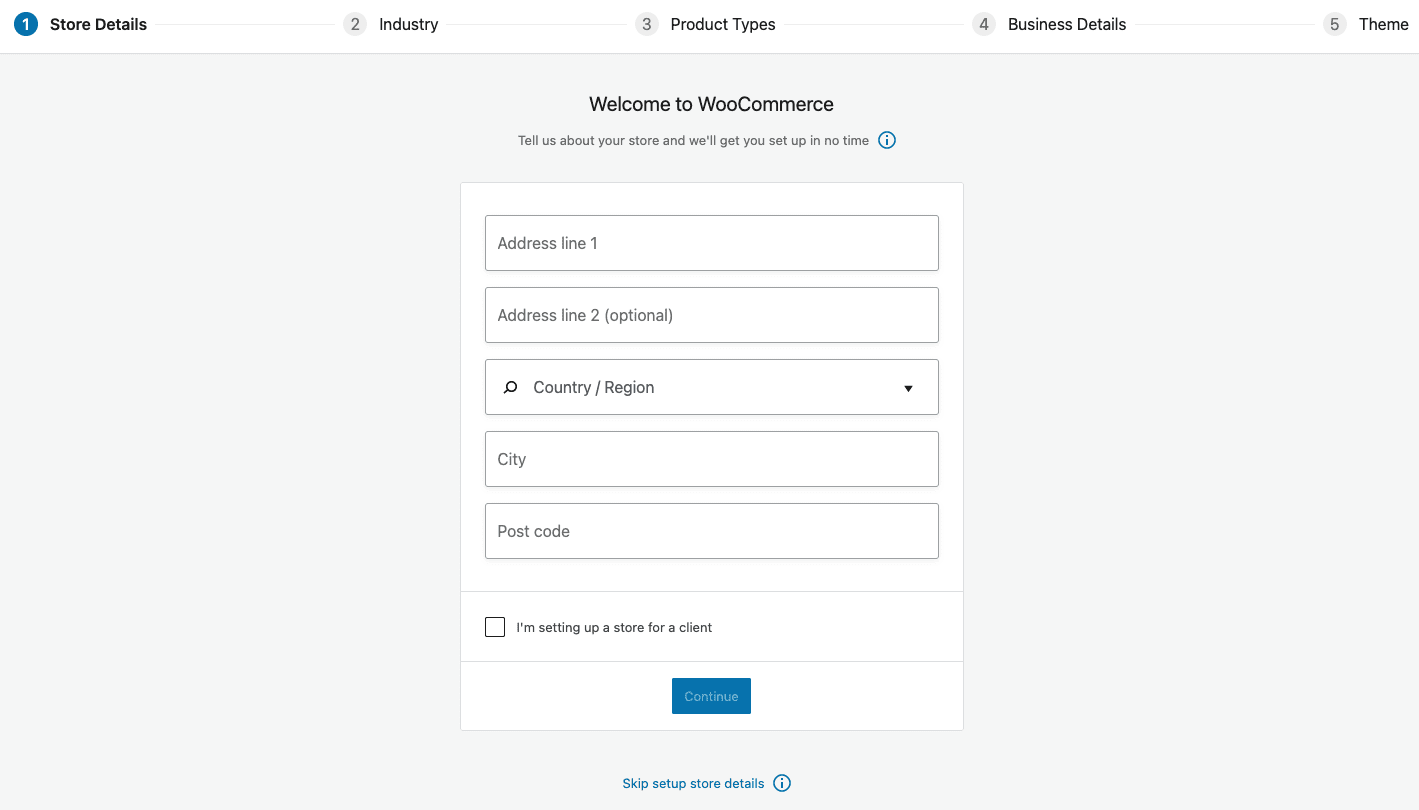
Once you activate WooCommerce plugin for the first time, you are invited to set up your shop using the WooCommerce setup wizard. It is pretty intuitive and allows you to get your shop running in no time.
Nothing can describe getting started with WooCommerce better than its original documentation. Here are links to help you get started:
If you want to get started manually, or skipped the setup wizard, then you need to get a set of shop pages.
Here is what you need to do:
- From the dashboard go to WooCommerce > Status > Tools;
- Find the Create default WooCommerce pages option;
- Hint the Create pages button on the right.
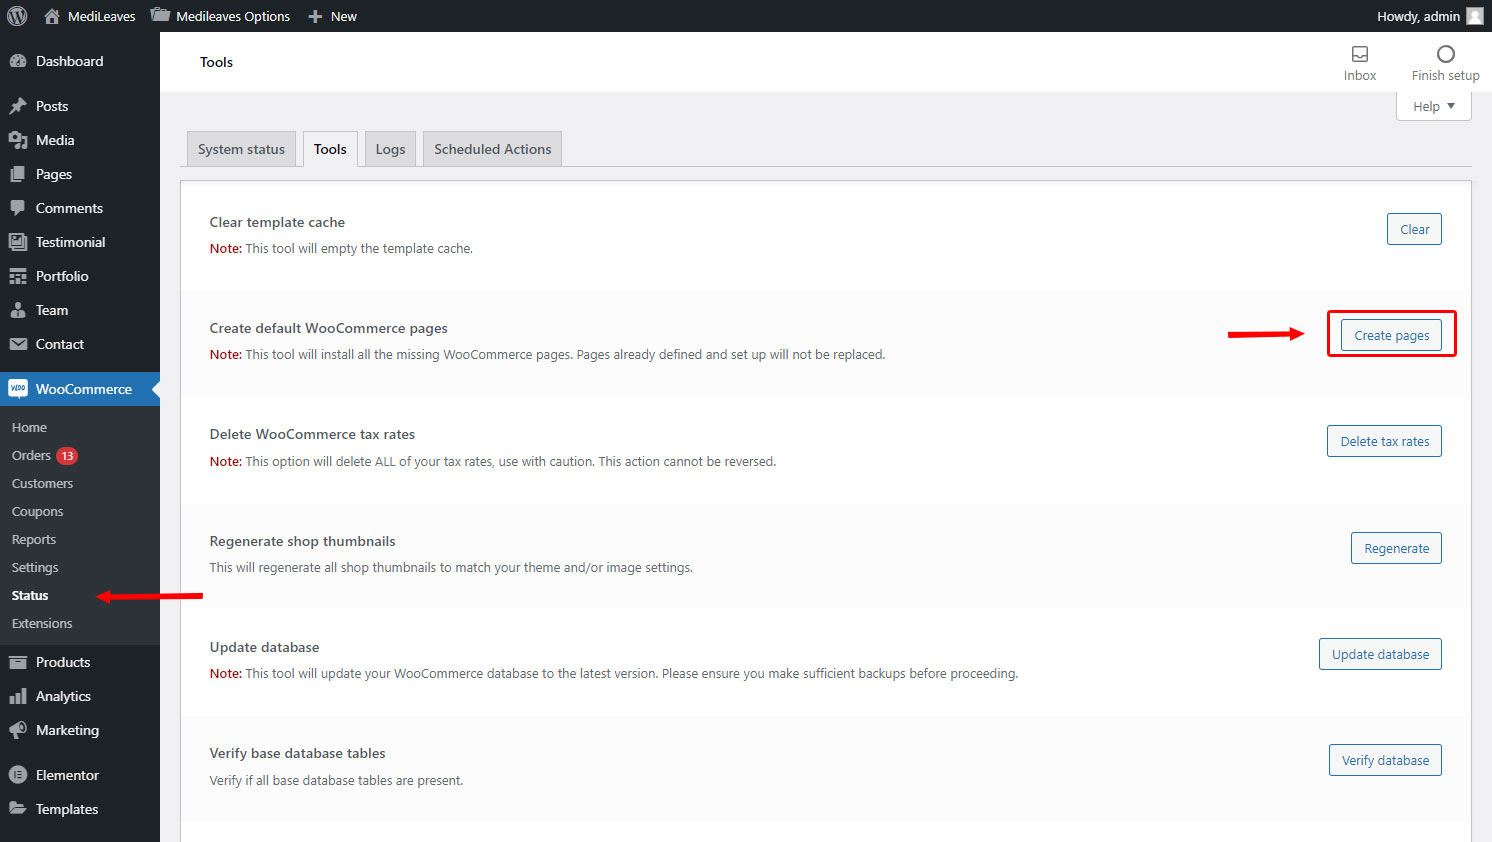
Now you should have a set of standard shop pages and are ready to work with WooCommerce.
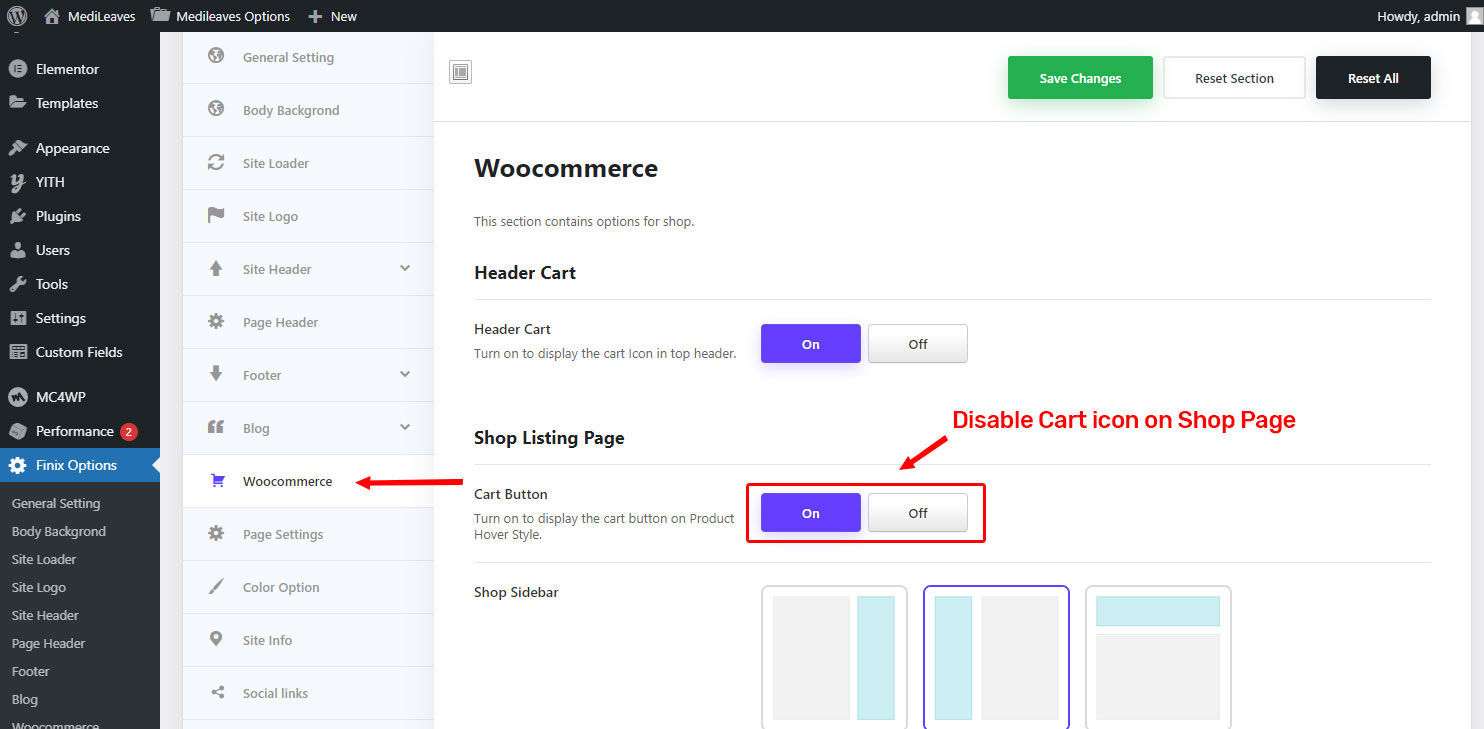
Disable a Cart Icon
To enable/disable the cart icon on your website without disabling a WooCommerce functionality do the following:
- From the dashboard go to Medileaves Theme > Medileaves Options > Woocommerce;
- Toggle the Cart Button switch to off the cart icon;
Revolution Slider
It's very easy to create a new slider. Here is a getting started video where you can learn how to create a new slider or modify your existing slider. Click here to see their document and learn basics and become pro.
You can also see video to learn basics or Slider Revolution plugin. See this video:
Translation
- You need to download and install poEdit program from here https://poedit.net/download
- Then goto ftp wp-conetent themes your theme folder languages. There you will find .pot file, open it with poEdit
- After edititng you need to set correct files name for your new files that will come after editing. More info about files naming you gan find here: https://poedit.net/download
- Open file wp-config.php in your Wordpress root folder and add the line define('WPLANG', ''); remember replace '' by the language you want. More details can be found here: WordPress in your language
- You can also translate theme using Logo Translate plugin: https://wordpress.org/plugins/loco-translate/
- Theme is fully compatibele with WPML Multilingual plugin, that can be used for translation and multilingual: WPML.org
Medileaves Changelog
You can see the detail about the changelog here. Power-Squall always update our themes with new features, bug fixes, and improvements. We highly recommend you to read the changelog for every update.
- - Some Minor Design Issue fixes and Improvements.
- - 2 New Pages added.
- - Sign In New Page added.
- - Sign Up New Page added.
- - Some Minor Design Issue fixes and Improvements.
- - WooCommerce Notice Issue fixes and improvements.
- - 3 New Demo added.
- - IT Solution New Demo added.
- - Web Agency New Demo added.
- - Web Development New Demo added.
- - WooCommerce 5.6.0 compatibility added.
- - YITH WooCommerce Wishlist 3.0.25 + compatibility added.
- - Back to Top Issue fixes and Improvements.
- - Minor style fixes and improvements.
Social links
The Social links tab allows you to set a list of your sharing links.